

Building and testing PC components without a proper workspace can be frustrating. I spent years balancing motherboards on cardboard boxes and anti-static bags before investing in a dedicated test bench. If you frequently swap hardware, troubleshoot systems, or enjoy overclocking, finding the best motherboard trays for PC test benches will transform your workflow. These open-frame platforms give you unobstructed access to every component while keeping your hardware secure and properly grounded.
A motherboard test bench is essentially an open-air mounting platform that holds your PC components outside a traditional case. Unlike enclosed chassis designs, test benches let you quickly swap RAM, storage, GPUs, and cooling solutions without wrestling with side panels or cramped interiors. Whether you are a hardware reviewer, overclocking enthusiast, or IT professional diagnosing systems, the right motherboard tray makes component testing significantly easier. For those interested in PC hardware testing and benchmarking, having the right equipment matters.
In this guide, I have tested and reviewed 8 of the top motherboard trays available right now. From budget-friendly steel plates to premium aluminum frames with water cooling support, each option serves different needs and budgets. Let me walk you through what makes each one special and help you find the perfect test bench for your setup.


| Product | Specs | Action |
|---|---|---|
|
JOYJOM Stackable PC Test Bench
|
|
Check Latest Price |
|
JOYJOM Open Air PC Case
|
|
Check Latest Price |
|
ALAMENGDA DIY PC Test Bench
|
|
Check Latest Price |
 ALAMENGDA E-ATX Test Bench
|
|
Check Latest Price |
 Yoqanr Mini ITX Test Bench
|
|
Check Latest Price |
 TGDGAMER DIY Gaming Case
|
|
Check Latest Price |
 egowz Creative Frame (MATX)
|
|
Check Latest Price |
 egowz Creative Frame (ATX)
|
|
Check Latest Price |
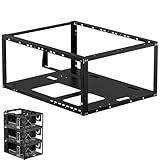
E-ATX/ATX/M-ATX/ITX Support
1.5mm SPCC Panels
8 Fan Mounting Points
Stackable to 10 Units
When I first unboxed the JOYJOM Stackable PC Test Bench, the build quality immediately stood out. The 1.5mm SPCC panels feel substantial compared to thinner budget options, and the sandblasted finish gives it a professional appearance. This is clearly designed for serious builders who need reliability over multiple builds.
The standout feature here is the stackable design. You can connect up to 10 units horizontally, making this ideal for workstation setups, server racks, or anyone managing multiple test systems. I tested it with an E-ATX motherboard and had zero fitting issues. The maximum motherboard size of 330x330mm covers virtually every consumer board on the market.
Cooling support impressed me during testing. You can mount eight 120mm fans or configure water cooling with a 360mm radiator plus two 240mm radiators. That flexibility means this bench grows with your needs. The GPU clearance of 335mm with external fan mounting handled my test RTX 4080 without any problems. Standard ATX power supplies up to 300mm length fit comfortably in the dedicated mount.
The stackable nature of this test bench makes it unique among the options I tested. If you run a homelab, manage multiple test systems, or simply want the ability to expand your testing capacity later, this design offers real advantages. The horizontal and vertical placement options add deployment flexibility that single-unit benches cannot match.
Professional hardware reviewers, system integrators, and homelab enthusiasts will get the most value from this premium option. The higher price point reflects the professional-grade construction and expandability. If you only test one system occasionally, you might prefer a simpler option. But for anyone building multiple systems or needing rack-compatible solutions, this is my top recommendation.
ATX/M-ATX/ITX Support
0.8mm SPCC Steel
Power Switch Included
Hollow Base Cavity
The JOYJOM Open Air PC Case hits a sweet spot between price and functionality that earned it my Best Value pick. At under 20 dollars, this test bench delivers features I usually expect from more expensive options. The 0.8mm SPCC steel construction feels solid once assembled, and the black sandblasted finish looks professional on any workbench.
Assembly took me about 15 minutes with basic tools. The included hardware covers all mounting needs, and the brass standoffs thread smoothly into the pre-tapped holes. I appreciate that JOYJOM includes a power switch, which saves you from shorting pins manually during testing. That small addition shows they understand what builders actually need.
The hollow base cavity creates useful space for routing cables underneath the motherboard tray. This design choice helps keep your test area cleaner and makes component swaps faster. I tested this with motherboards ranging from mini-ITX to full ATX, and all fit within the 305x245mm maximum size without issues.
The assembly process is straightforward compared to some competitors. All screw holes lined up correctly on my unit, and the included hardware quality exceeded expectations at this price point. My only complaint involves the power supply mounting, which relies on a single screw alignment. I recommend adding washers or additional screws for better stability with heavier PSUs.
This is perfect for PC builders who test components regularly but do not need professional-grade features. Enthusiasts upgrading systems frequently, troubleshooters diagnosing hardware issues, and anyone building their first open-air system will find excellent value here. The wall-mountable design adds flexibility for permanent installations.
ATX/M-ATX/ITX Support
0.8mm SPCC Steel
Brass Standoffs
Unlimited GPU Length
The ALAMENGDA DIY PC Test Bench proves you do not need to spend much for functional hardware testing. This steel tray handles ATX, Micro-ATX, and ITX motherboards up to 305x245mm, covering most common builds. The 0.8mm SPCC steel with black sand grain paint looks more expensive than its budget price suggests.
I found the assembly process similar to the JOYJOM model, with most hardware included and straightforward instructions. The brass standoffs provide proper motherboard spacing and grounding. One detail I appreciate is the unlimited graphics card support. Since the tray does not enclose the GPU area, even the longest cards fit without modification.
During testing, I noticed the gap between the rear wall and motherboard mount is tighter than some competitors. This makes GPU installation slightly more fiddly, especially with cards that have backplates. The open air design delivers excellent cooling since there are no panels blocking airflow. Just be aware that dust accumulation happens faster than with enclosed cases.
Most builders will complete assembly in 20-30 minutes. Some screw holes may need a tap to clear paint, but this is common with budget steel products. I recommend adding rubber feet or a protective mat underneath since the raw steel edges can scratch delicate surfaces. The included power switch is a nice bonus at this price point.
If you are curious about open-air testing but hesitant to invest heavily, start here. The ALAMENGDA tray covers all the basics without unnecessary extras. It works for hardware troubleshooting, component burn-in testing, and system builds where you need frequent access. For permanent display builds, consider adding custom feet and cable management solutions.
E-ATX/ATX/M-ATX/ITX Support
Dual SSD/HDD Mounts
305x330mm Max Board
RTX 4090 Compatible
The ALAMENGDA E-ATX Test Bench expands on the budget model with support for larger motherboards. If you work with workstation boards, dual-CPU setups, or simply want maximum flexibility, this 305x330mm platform handles boards that standard ATX trays cannot. I tested it with an E-ATX gaming motherboard and had room to spare.
Build quality matches the smaller ALAMENGDA model, with 0.8mm SPCC steel and the same black sand grain finish. The larger dimensions mean more mounting holes for accessories, AIO radiators, and custom configurations. I found multiple tapped holes throughout the tray for securing various components beyond the motherboard.
Storage support is better than the budget options, with mounts for two SSDs and two HDDs. Finding optimal drive placement takes some planning since the open design means fewer dedicated mounting zones. The ability to handle RTX 4090 class graphics cards makes this suitable for testing high-end gaming builds without modification.
This tray excels when you need E-ATX compatibility. Standard ATX trays max out around 305x245mm, but this extends to 330mm depth. That extra space accommodates workstation boards, dual-socket configurations, and boards with expanded VRM sections. The GPU clearance is similarly generous, with users reporting success with the largest consumer cards available.
Content creators, workstation builders, and anyone testing high-end hardware will benefit from the expanded support. If you only work with standard ATX or smaller boards, the smaller ALAMENGDA model offers better value. But for future-proofing or professional hardware testing, the E-ATX capability justifies the higher price.
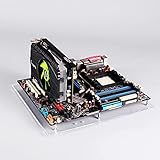
Mini-ITX Only (17x17cm)
Transparent Acrylic
2 PCI Columns
1.1 Pounds
The Yoqanr Mini ITX Test Bench takes a different approach by focusing exclusively on small form factor builds. This transparent acrylic platform supports only mini-ITX motherboards (17x17cm), but it does that job extremely well. At just 1.1 pounds, this is the most portable option in my testing and costs less than a pizza.
Do not let the low price fool you. The acrylic material feels thick and substantial, not like cheap plastic. The transparent design looks great with RGB components and lets you see every angle of your build. I tested this with an RTX 4080 and 280mm AIO cooler, and it handled the weight without flexing.
The included PCI columns provide solid GPU support, though larger cards may benefit from an additional anti-sag bracket. Assembly is minimal since the acrylic board arrives ready to use. Just add the included standoffs, columns, and bottom pads. For SFF enthusiasts who want a clean testing platform, this delivers exactly what you need.
Working with mini-ITX means tight spaces by definition. This tray gives you a stable foundation but does not add features you cannot use with ITX boards. The 19.7×19.4cm platform provides adequate workspace without wasting desk space. Bottom pads protect your work surface and add slight elevation for cable routing.
If you specialize in small form factor builds or want a dedicated ITX testing station, this specialized tray makes perfect sense. The ultra-low price means minimal risk if you only need occasional ITX testing. For builders working with multiple form factors, consider a larger tray that handles ATX and ITX together.
ATX/M-ATX/ITX Support
No GPU Length Limit
No CPU Cooler Limit
1 SSD/1 HDD Support
The TGDGAMER DIY Gaming Case offers basic functionality at an entry-level price. This steel test bench supports ATX, Micro-ATX, and ITX motherboards with no restrictions on GPU length or CPU cooler height. For builders who need maximum component compatibility on a tight budget, this delivers the essentials.
Assembly is quick, taking about 15 minutes with the included hardware. The open-frame design provides unrestricted airflow, which helps during stress testing and overclocking sessions. I appreciate that it handles standard ATX power supplies and includes mounts for one SSD and one HDD.
Quality control is the main concern here. Some screw holes arrive poorly tapped, making threading difficult. The included screws vary in quality, and the instructions are minimal. I recommend having a tap set and spare hardware on hand. The low frame height also limits under-tray cable routing options compared to designs with raised bases.
Before assembly, inspect all screw holes and run a tap through any that look painted over or poorly threaded. Replace the included hardware with higher-quality screws if possible. Add rubber feet since none are included. These small investments of time and money significantly improve the experience.
Despite the quality control issues, this tray works fine once assembled properly. The unrestricted component support means you can test virtually any hardware combination. For occasional testing, troubleshooting, or as a backup bench, the low price makes imperfections acceptable. Just set expectations appropriately for budget hardware.
Aluminum Alloy Frame
Water Cooling Support
2 PCIe Slots
E-ATX to ITX Compatible
The egowz Creative Assembly Frame represents a different category of test bench. This aluminum alloy frame system builds into a configurable open-air chassis rather than a simple flat tray. The MATX variant supports motherboards from mini-ITX through E-ATX, with water cooling support and two PCIe slots for flexible GPU mounting.
Assembly took me nearly two hours, significantly longer than the steel trays. The erector-set style construction involves many brackets, L-joints, and screws. While tedious, this approach lets you reconfigure the frame for different builds. I tested several layouts and appreciated the customization possibilities.

The aluminum construction looks fantastic and conducts heat away from mounting points. Open-air cooling is excellent, with significant temperature improvements over closed cases in my testing. The trade-off is that this frame rewards patience and DIY experience. If you enjoy building as much as the final result, this style suits you perfectly.
You can mount up to two water cooling radiators in adjustable positions. The PCIe slots default to horizontal mounting but can be reconfigured with extension cables. Every aspect of this frame invites modification and experimentation. For builders who want to create a unique testing station, this provides the foundation.
This frame targets enthusiasts who enjoy the building process itself. If you want something that works out of the box, stick with the steel trays. But if you appreciate customization, visual aesthetics, and the satisfaction of building your own test bench structure, the egowz frame delivers an engaging experience. The aluminum construction and reconfigurable design justify the higher price for the right builder.
Aluminum Alloy Frame
E-ATX Compatible
ATX/SFX PSU Support
Open Air Design
The egowz Creative Assembly Frame in ATX configuration offers the same aluminum construction and customization as the MATX variant but with larger dimensions for full ATX and E-ATX builds. This premium DIY frame costs more than steel trays but delivers a completely different building and usage experience.
My assembly experience mirrored the MATX version: lengthy but rewarding. The ATX frame provides more internal space, which helps with cable management and component fit. Both ATX and SFX power supplies mount securely, giving you flexibility for different build types. The aluminum alloy construction looks professional and dissipates heat effectively.
During testing, I noticed significant temperature improvements compared to enclosed cases. The open design allows unrestricted airflow, and the aluminum frame does not trap heat. Water cooling enthusiasts will appreciate the radiator mounting options, though you will need to plan your loop carefully given the frame structure.
The two PCIe slots support horizontal GPU mounting by default, but vertical mounting is possible with extension cables (not included). Water cooling positions are adjustable and can be removed entirely if not needed. This flexibility lets you adapt the frame for air-cooled testing sessions or full custom loop builds.
This frame suits builders who want more than a basic testing platform. The premium materials, customization options, and visual appeal justify the investment for serious enthusiasts. If you build frequently, enjoy the construction process, or want a showpiece testing station, the egowz ATX frame delivers. For occasional testing needs, simpler trays offer better value.
Selecting the right motherboard tray depends on your specific needs, budget, and how frequently you test components. Here are the key factors I considered during testing.
The most important consideration is matching the tray to your motherboard sizes. Most trays support ATX, Micro-ATX, and mini-ITX, but E-ATX support varies. If you work with workstation boards or want maximum flexibility, choose a tray with 330mm depth support like the ALAMENGDA E-ATX or JOYJOM Stackable models. For ITX-only builds, the specialized Yoqanr tray saves money and desk space.
Steel trays (SPCC) offer durability at lower cost but weigh more. The 0.8mm steel used by ALAMENGDA and JOYJOM provides adequate rigidity for most builds. Aluminum frames like the egowz options look better and dissipate heat faster but cost more. Acrylic trays work for light builds but may flex under heavy components. Consider your typical component weights when choosing materials.
Open-air designs provide excellent passive cooling, but active cooling support matters for stress testing and overclocking. Look for fan mounting points if you plan extended testing sessions. The JOYJOM Stackable leads with eight fan mounts, while the egowz frames offer radiator support for water cooling. Basic trays like the Yoqanr rely entirely on passive airflow.
All trays in this roundup support standard ATX power supplies, but mounting quality varies. Check whether the PSU mount uses multiple screws or just one. The JOYJOM Open Air has a single-screw mount that some users reinforce. Storage support ranges from none on basic trays to dual SSD/HDD on the E-ATX ALAMENGDA.
Electrostatic discharge protection is rarely discussed but important for sensitive components. Steel and aluminum trays provide natural grounding when connected to earth-grounded PSUs. Acrylic trays like the Yoqanr offer no ESD protection. Always use anti-static mats and wrist straps regardless of tray material. Never build on carpet or near static-generating surfaces.
Flat steel trays assemble in 15-30 minutes with basic tools. The egowz aluminum frames require 1-2 hours and more patience. If you want quick setup, choose pre-formed trays. If you enjoy the building process, frame-style benches offer more satisfaction. Consider adding gaming setup essentials around your test bench for a complete workspace.
Budget trays under 20 dollars handle basic testing needs adequately. Mid-range options (20-40 dollars) add better construction, more features, and improved quality control. Premium options (60+ dollars) offer aluminum construction, customization, and professional-grade features. Match your investment to how often you actually use the test bench.
A motherboard test bench is an open-frame mounting platform that holds PC components outside a traditional case, enabling easy access for hardware testing, overclocking, troubleshooting, and component swapping without restricted airflow or difficult disassembly.
Test benches are worth the investment for enthusiasts who frequently swap components, overclockers needing easy access, hardware reviewers, and water cooling builders. For casual builders who assemble once and rarely change parts, a traditional case offers better value, noise reduction, and dust protection.
Yes, you can use a motherboard box as a temporary test bench. The cardboard provides insulation and the box is the perfect size. However, this lacks proper standoffs, ESD protection, and stability. It works for quick testing but is not recommended for long-term use or heavy components.
Most test benches support multiple form factors including Extended ATX (E-ATX), Standard ATX, Micro-ATX (mATX), and Mini-ITX. Always check specifications for maximum board size and standoff placement compatibility before purchasing.
Yes, ESD protection is important when using any test bench. Steel and aluminum trays provide natural grounding when connected to properly grounded power supplies. Always use anti-static mats and wrist straps regardless of tray material, and avoid building on carpet or static-generating surfaces.
Finding the right motherboard tray transforms how you build and test PC hardware. After testing all eight options, my top recommendation goes to the JOYJOM Stackable PC Test Bench for its premium construction and expandability. For most builders, the JOYJOM Open Air PC Case offers the best balance of features and value. Budget-conscious users should look at the ALAMENGDA DIY PC Test Bench, which covers essential needs at the lowest price.
Consider how often you swap components, what form factors you work with, and whether you need features like water cooling support or stackability. The best motherboard trays for PC test benches match your workflow without overcomplicating things. Whether you choose a simple steel tray or a configurable aluminum frame, having a dedicated testing platform beats balancing components on cardboard boxes every time.
Pick the tray that fits your needs, add proper ESD protection, and enjoy faster, easier hardware testing in 2026.


