

If you’re diving into Plants vs Brainrots, you’ve probably realized that having the best plants isn’t enough to dominate the game. The right gears can make or break your defense strategy, turning a losing battle into a glorious victory. I’ve spent countless hours testing every gear, analyzing their synergies, and discovering hidden strategies that most guides completely miss.
In this comprehensive guide, I’ll reveal all 15+ gears available in Plants vs Brainrots, complete with their exact stats, optimal usage strategies, and pro tips that will elevate your gameplay from beginner to expert. Whether you’re looking to boost your plant growth, stun powerful brainrots, or deal massive damage, this guide has everything you need.
| Gear | Rarity | Price | Primary Use | Best For |
|---|---|---|---|---|
| Bat Series | Common-Godly | Free-Rebirth | Melee damage | Early game defense |
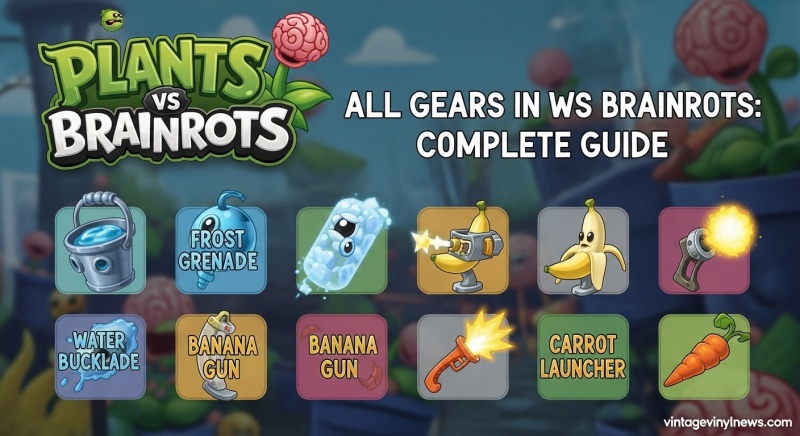
| Water Bucket | Epic | $7,500 | Plant growth boost | Speed farming |
| Frost Grenade | Epic | $12,500 | Stun + damage | Boss battles |
| Banana Gun | Epic | $25,000 | Ranged damage | Crowd control |
| Frost Blower | Legendary | $125,000 | Freeze + slow | Area denial |
| Carrot Launcher | Godly | $500,000 | Massive damage | Endgame content |
| Lucky Potion | Legendary | 179 Robux | Luck boost | Rare hunting |
| Speed Potion | Legendary | 199 Robux | Speed boost | Quick farming |
| Damage Potion | Legendary | 199 Robux | Damage boost | Power sessions |
| Premium Water Bucket | Limited | Event only | Enhanced growth | Event farming |
| Taser | Limited | Event only | Stun + damage | Emergency control |
| Handcuffs | Limited | Event only | Long stun | Boss lockdown |
| Riot Potion | Limited | Event only | Spawn boost | Grinding sessions |
Gears are special tools, weapons, and consumable items in Plants vs Brainrots that provide players with tactical advantages. Unlike your plants that work automatically, gears don’t activate on their own—you need to manually equip or activate them when needed. This manual aspect makes gear mastery absolutely crucial for high-level play.
Think of gears as your personal toolkit against the brainrot invasion. Some gears help your plants grow faster, others slow down or disable brainrots, and some deal direct damage to clear the field quickly. The key is knowing which gear to use in which situation, and that’s exactly what I’ll teach you in this guide.
Pro Tip: All gears (except the bat) are temporary and will disappear after use or when their ammo runs out. This means you need to be strategic about when and how you use them!
The bat is your starting weapon, but don’t underestimate it—through rebirths, it becomes one of the most powerful weapons in the game!
| Bat Type | Rebirth Level | Damage | Special Notes |
|---|---|---|---|
| Basic Bat | None (starter) | 20 damage | Free, available to all players |
| Leather Grip Bat | 1st Rebirth | 30 damage | First upgrade, noticeable improvement |
| Iron Plate Bat | 2nd Rebirth | 40 damage | Solid mid-game weapon |
| Iron Core Bat | 3rd Rebirth | 50 damage | Starting to pack a punch |
| Aluminum Bat | 4th Rebirth | 67 damage | Major damage jump |
| Hammer Bat | 5th Rebirth | 75 damage | Reliable heavy hitter |
| Skeletonized Bat | 6th Rebirth | 175 damage | Massive damage boost |
| Fluted Bat | 7th Rebirth | 210 damage | Endgame weapon material |
| Spiked Bat | 8th Rebirth | 265 damage | Devastating melee damage |
| Rifling Bat | 9th Rebirth | 320 damage | Ultimate bat weapon |
Why It’s Essential: The bat series is your only permanent weapon, making it incredibly valuable for consistent defense. By the time you reach higher rebirths, your bat will outperform most shop-bought weapons.
The Banana Gun is your first real upgrade from the basic bat, offering ranged combat capabilities. It’s perfect for dealing with brainrots before they get too close to your plants. The 42-shot limit means you need to make each shot count.
Pro Strategy: Save your Banana Gun for waves with multiple medium-health brainrots. The fast fire rate lets you clear them quickly, preserving your plants for tougher enemies.
The Frost Blower is essentially an upgraded version of the Frost Grenade with area-of-effect capabilities. It’s incredibly useful for controlling large groups of brainrots, giving your plants more time to work.
Hidden Synergy: Use the Frost Blower first to freeze a group, then switch to your bat or Banana Gun for easy kills while they’re immobilized.
This is the big one—the most powerful gear in the regular shop. The Carrot Launcher deals massive damage that can take down even the toughest brainrots in just a few hits. However, be careful with the knockback effect, as it can send brainrots flying into your plants if you’re not positioned correctly.
Endgame Strategy: The Carrot Launcher is your go-to weapon for boss battles and high-level brainrots. Pair it with Frost Grenades to keep dangerous enemies in place while you unload massive damage.
The Water Bucket is one of the most underrated gears in the game. A 25% growth boost might not sound like much, but when you’re trying to grow rare, high-value plants, those minutes saved add up quickly.
Farming Strategy: Use Water Bucket on your most valuable plants immediately after planting them. This maximizes the time bonus and gets you to harvest faster.
This is the Water Bucket on steroids. If you manage to get one during the Prison Event, treasure it—it’s twice as effective as the regular version and can dramatically speed up your farming operations.
Event Tip: During the Prison Event, focus on completing all objectives to earn the Premium Water Bucket. It’s worth the effort, especially if you plan to do extensive farming.
In my opinion, the Frost Grenade is the single most important gear in Plants vs Brainrots. The ability to stun dangerous brainrots gives your plants crucial extra time to deal damage, and it can be the difference between winning and losing against tough enemies.
Boss Battle Strategy: As soon as a high-health brainrot enters your lawn, time your Frost Grenades carefully. Count to 3 before throwing the next one (it has a split-second animation before it actually stuns). This timing will keep even the toughest bosses permanently stun-locked.
The Taser is like a supercharged Frost Grenade with massive damage attached. It’s incredibly useful for emergency situations when you need to stop a powerful brainrot in its tracks.
Pro Tip: Save your Tasers for admin abuse events when multiple high-level brainrots spawn. The combination of stun and high damage makes them perfect for these chaotic situations.
Handcuffs offer the longest stun duration in the game, making them perfect for setting up devastating combos with your damage-dealing gears.
Combo Strategy: Use Handcuffs first to immobilize a target, then switch to your Carrot Launcher or high-level bat for maximum damage while they can’t move.
The Lucky Potion is essential for anyone serious about collecting rare brainrots. The doubled luck significantly increases your chances of getting those elusive high-value variants.
Stacking Strategy: Save your Lucky Potions and use them during admin abuse events when rare spawn rates are already increased. The stacking effect can lead to incredible hauls.
Speed Potions make everything faster—your plants attack quicker, brainrots move faster (but die faster too), and you can react more quickly to threats.
Best Use Case: Use Speed Potions when you have a well-established defense and want to speed through farming sessions. The increased attack speed on your plants can dramatically boost your income.
The Damage Potion turns your plants into killing machines. For 30 minutes, every plant on your field deals significantly more damage, making it perfect for tough waves or boss battles.
Timing Strategy: Use Damage Potions at the beginning of difficult waves or just before a boss spawns. The 30-minute duration gives you plenty of time to maximize its effectiveness.
This is the high-risk, high-reward gear. More brainrots mean more potential rewards, but also more danger. Only use this when you have a strong defense established.
Grinding Strategy: Use Riot Potions during admin abuse events when you have powerful plants and control gears ready. The increased spawn rate can lead to massive rewards if you can handle the pressure.
The main way to get gears is through Joel’s Gear Shop, located on the right side of the island when you spawn. Here’s what you need to know:
Location: Right side of the main island, next to the sell shop Interaction: Press E to talk to Joel and browse available gears Restock Schedule: The shop refreshes every 5 minutes automatically Manual Restock: You can spend 80 Robux to force an immediate restock
Pro Shopping Strategy: Check the shop every 5 minutes for rare items like Frost Grenades and Carrot Launchers. These high-demand items sell out quickly, so timing is everything.
For players willing to spend real money, most gears are available in the Robux shop at premium prices. This is the fastest way to get gears, but it can get expensive quickly.
Limited gears like the Premium Water Bucket, Taser, Handcuffs, and Riot Potion are only available during special events like the Prison Event. These events are your only chance to get these exclusive items.
Some gears, particularly potions, can be obtained through redeem codes. Keep an eye on the official Plants vs Brainrots Twitter and Discord server for the latest codes.
Current Known Codes:
Based on hundreds of hours of testing, here’s my definitive tier list for Plants vs Brainrots gears:
The most powerful strategy in Plants vs Brainrots is potion stacking. By using multiple potions simultaneously, you can create incredible synergies:
The Ultimate Combo:
This combination turns you into a farming machine, especially during admin abuse events when spawn rates are already high.
Many players waste their best gears on weak brainrots early in waves. Save your Frost Grenades and Carrot Launchers for the tough enemies that actually threaten your defense.
Don’t neglect your bat just because you can buy other weapons. A high-level bat from rebirths will outperform most shop items and is always available.
Using potions at the wrong time wastes their potential. Save them for admin abuse events, tough waves, or when you’re about to plant valuable seeds.
Remember that gears don’t work automatically. I’ve seen so many players buy expensive items only to forget to use them when needed.
The 5-minute restock cycle means you need to check frequently for rare items. Set a timer or make it a habit to visit Joel between waves.
If you’re using a controller, consider remapping your gear buttons for quicker access. The default setup can be clunky during intense battles.
With the exception of the bat, all gears are temporary and will disappear after use or when their ammo runs out. This is why strategic usage is so important.
The Gear Shop automatically restocks every 5 minutes. You can also force a restock by spending 80 Robux if you’re in a hurry.
For new players, I recommend focusing on Frost Grenades first. They’re relatively affordable and incredibly useful for learning the game’s mechanics.
Yes! You can upgrade the bat by performing rebirths. Each rebirth level unlocks a more powerful version of the bat, eventually making it one of the best weapons in the game.
Purchased gears are stored in the “Gear” section of your inventory. You need to manually activate or equip them when you want to use them—they don’t work automatically.
For casual players, I’d recommend sticking to in-game currency purchases. However, if you play frequently, investing in key items like Lucky Potions can significantly improve your farming efficiency.
The combination of Frost Grenade + Carrot Launcher + Damage Potion is devastating against bosses and high-level brainrots. It’s expensive but worth every penny.
Limited gears are only available during special events like the Prison Event. Participate in these events and complete all objectives to earn these exclusive items.
Absolutely! Admin abuse events are when you’ll get the most value out of your gears, especially potions and control items. The increased spawn rates and special enemies make these events perfect for gear usage.
The Premium Water Bucket (event-only) provides a 50% growth speed boost, while the regular Water Bucket only gives 25%. That’s double the effectiveness for the same function.
After spending countless hours with every gear in Plants vs Brainrots, I can confidently say that gear mastery is what separates good players from great ones. The right gear at the right time can turn certain defeat into glorious victory.
Remember these key takeaways:
The gear system in Plants vs Brainrots is deep and rewarding once you understand it. Don’t get discouraged if you don’t have all the best items right away—focus on mastering the essentials first, and the rest will follow naturally.
Pro Tip: Bookmark this guide and check back regularly, as I’ll be updating it with new gears and strategies as they’re released in future updates. The game is constantly evolving, and staying current is key to maintaining your competitive edge.
Now it’s your turn! Head into Plants vs Brainrots with this knowledge and start experimenting with different gear combinations. You’ll be amazed at how much more effective your defense becomes when you’re using the right tools for the job.
Happy hunting, and may your gears always be stocked!


