On my journey through the vast music production landscape, I’ve encountered fascinating concepts and techniques that bring unique flavors to songs.
Today, I want to dive deep into one such process that plays a quintessential role in professional audio production, particularly in mastering – understanding mix bus compression.
Not only will learning this skill contribute a polished touch to your tracks, but it can also provide an enhanced overall listening experience, which is crucial.
If you’re an avid music producer or someone who loves tinkering around with sound levels on their mixing console occasionally, you’ll know how crucial proper compression can be.
How each element melds into the mix can make or break a track. So, before proceeding further with any experimentation, let’s draw out the nuts and bolts of mix bus compression and see how it can give your music that palpable edge.
What is Mix Bus Compression?
Mix bus compression, also known as bus compression, is a fundamental technique used in the mixing process of audio production.
This compression type aims to take the mix as a whole or subgroup of tracks and process them together to achieve sonic coherence and a more robust yet balanced sound.
It’s a subtle technique that gently “glues” individual parts of the mix together to establish an overall balance.
The magic touch comes from how it consolidates different frequencies, allowing distinct elements to interact harmoniously rather than compete within the same space.
Also Read: 25 Tips For Recording And Mixing Vocals In 2025
Why Is Mix Bus Compression Essential in Audio Mixing?

Mix Bus Compression is a crucial audio mixing process used to unify and control the mix by applying subtle compression on the master or mix bus.
This method involves adjusting the dynamic range of a composite blend, retaining balance among tracks, enhancing musical cohesion, and making the overall sound fuller and more professional.
It’s essential as it ensures consistency of audio levels throughout the mix, avoiding any abrupt jumps or drops in volume.
It requires careful handling because over-compression can lead to a loss of dynamic contrast and detail in the music.
- It enhances the perceived loudness without pushing up actual volume levels.
- Implements an additional sense of depth and some ‘3D’ characteristics.
- Adds glue and results in increased cohesion within your mix.
- Promises a smoother experience when transitioning between intense and milder sections.
But like any tool on your mixing desk or DAW software, understanding when and how to use it makes all the difference!
Exploring the Four Main Compressor Types
In audio signal processing, various strategies modify and shape the sound. One of these involves compression, which directly influences dynamic range.
Different types of compressors bring their unique characteristics and operations to the table.
Here are the four primary compressor types often used in mixing and mastering.
Optical Compressors
Optical compressors use a photocell and light source to control the dynamic range.
When the input signal increases, more light is emitted onto the photocell responsible for maintaining gain reduction – thereby reducing output signal strength.
Known for their musical nature and gentler knees, they’re perfect for softer genres or delicate applications like vocals and acoustic instruments.
Variable Mu Compressors
Variable Mu or tube compressors, as one can guess from the name, employ tubes to reduce the signal level.
Instituting a smooth attack & slow release, they offer natural-sounding compression – great for smoothing groups without adding audible artifacts with warmth to your mix.
VCA Compressors
Unsigneding Voltage Controlled Amplifiers (VCA), VCA compressors bestow high precision with minimal distortion due to their speedy response times & flexibility in configuring ‘Ratio’, ‘Attack,’ & ‘Release’ accurately.
They bring punchiness & power into tracks – making them advantageous for drums & rhythmic instruments.
FET Compressors
Embracing Field-Effect Transistors (FET), FET compressors offer super-fast attack times, contributing to aggressive mix tonality.
Consequently, they provide effective results on transient-rich sources such as drums or percussion.
Each has diverse characteristics that make them favorable for specific scenarios or sources.
Henceforth, keenly understanding them will have immediate and long-term benefits in your production skill set.
Also Read: What Is A Studio Compressor? [Do You Need It For Home Studio?]
Delving into Mix Bus Compression Parameters

Getting familiar with mixed bus compression parameters can elevate your mastering skills monumentally.
You’ll need to fine-tune these controls to achieve the perfect balance in your mix. Let’s break down each one of them.
Attack
The attack determines how quickly the compressor is activated once the input signal crosses the threshold level. Essentially, it’s defining how soon we’re catching and taming those pesky peaks!
A slow attack allows more initial transient (the original punchy part of a sound) through before clamping down, giving a natural and dynamic feel.
A fast attack instantly controls all peaking incidents but at the cost of potentially squashing some life out of your mix.
Release
Conversely, release dictates how quickly the compressor stops compressing after a signal falls below our defined threshold.
A rapid release relinquishes control as soon as possible, providing more dynamics but with a risk of distorting lower frequencies or causing “pumping” (undesirable fluctuation in volume).
A slower release ensures a smoother transition out of compression, sustaining cohesiveness, but may also render your sound overly flat if not utilized mindfully.
Ratio
The ratio is crucial; it sets how much compression we apply over the signal beyond our threshold.
For instance, a 2:1 ratio means for every 2 dB we cross over our threshold, only 1dB will be allowed past – effectively reducing dynamics by half.
Threshold
Threshold marks where compression begins – signals surpassing this level get compressed while anything below remains unaffected.
Remember, squeezing everything hard isn’t usually desirable; hence, maintaining an appropriate threshold is integral.
Makeup Gain
Finally, makeup gain or output gain compensates for volume lost due to compression. It’s our tool to bring back some loudness post-compression without affecting dynamics further.
Each parameter has nuances, so finding a perfect balance requires practice and astute listening!
Utilize these tools wisely and remember subtlety often makes substantial impacts.
Also Read: How To Compress Vocals For Pro Results 2025 [Mistakes To Avoid]
How to Set Up Mixbus Compression?
Setting up mix bus compression might initially seem intricate, but trust me, it’s not rocket science.
Once you grasp the basics and develop your unique methodology, incorporating bus compression into your mixing routine will become second nature.
To get started on this remarkable journey, let’s break down the setup process into a step-by-step guide.
Identify Your Mix Bus
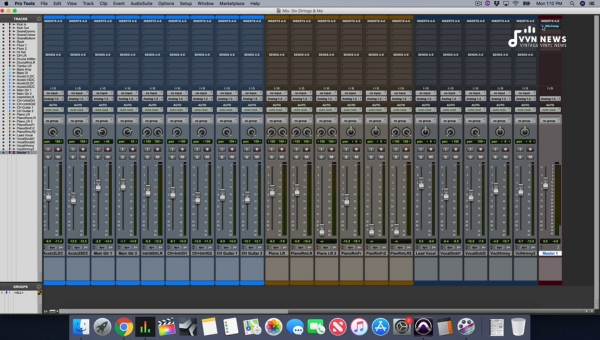
Your mix bus is usually the stereo output or master fader, where all your tracks are routed for final mixing. This is where we will implement our bus compressor.
Choosing a Compressor Plugin
There are innumerable compressor plugins available for this task. Selecting one that complements your mixing approach and overall track aesthetic is crucial.
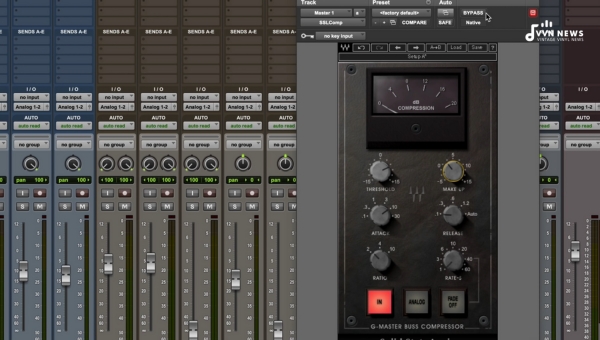
Some tried and tested options include the SSL G-Master Buss Compressor, Fab-Filter Pro C-2, or Waves API 2500.
Setting Up Your Parameters
Once you’ve chosen a compressor plugin, it’s time to set up your parameters:
Threshold: Adjust this until you see a gain reduction on your loudest parts – an ideal ballpark figure would be between -2 to -4 dB.
Ratio: Keep it low for mix bus compressing – around 1.5:1 to 2:1.
Attack: A slow attack time typically works best to preserve transients and add a sense of punchiness to your mix (30ms onwards).
Release: Setting up release depends significantly on your source material – faster release times can make everything sound more ‘exciting’, while slower ones give a smoother experience.
Applying Makeup Gain
After compressing, it’s essential to restore any lost loudness with makeup gain but do so carefully, as excessive makeup gain could minimize the dynamics achieved through compression.
Remember that mix bus compression should be a subtle enhancement rather than extensively changing how things sound in your mix.
Which Mix Bus Compressor Should We Use?

Making the best choice for your mix bus compressor heavily relies on the kind of sound you desire to achieve, the genre you’re working in, and your preference.
Regarding analog-style plug-ins, some engineers swear by the SSL G-Master Buss Compressor, famous for its unique ability to ‘glue’ mixes.
Meanwhile, others might lean towards something warmer, like the Manley Variable Mu, for its tonal richness.
Your mix might call for a more modern sound, so digital compressors such as FabFilter Pro-C2 or Tokyo Dawn’s TDR Kotelnikov GE could be more fitting options. They offer transparency with their advanced side-chain filtering capabilities.
So remember, there is no one-size-fits-all compressor! Experimenting with various compressors and tweaking settings will give you a better grip on your audio and broaden your musical horizons.
In this perpetual pursuit of sonic perfection, always trust your ears – they are your most reliable tool.
Also Read: Multiband Compression And EQ 2025 [How And When To Use?]
Common Mistakes with Mix Bus Compression & How to Avoid Them
Regardless of how expert we become at our craft, errors do creep in. And mix bus compression is no exception.
Let’s address some common mistakes that can impact how effectively bus compression functions and, consequently, the quality of your resulting mix.
Avoiding Stock Plugins
It’s easy to fall into the lure of believing that stock plugins are inferior tools compared to expensive third-party options. This myth could lead you to poor product decisions and financial regret. Stock plugins in your DAW can provide satisfactory results if appropriately used.
So before you shell out your money on that shiny new plugin, try diving deeper into learning about stock plugin options and their potential effectiveness.
Every Digital Audio Workstation (DAW) has a selection of READY-TO-USE stock compressors that are more than enough for quality bus compression.
Using Too High a Ratio
This is a guess-and-check game. The ratio is the proportion by which the signal exceeding the threshold will be reduced. A high percentage can lead to an overcompressed sound, sucking out all life from your mix.
As a rule of thumb, when dealing with mix bus compression, start lightly — opt for low ratios around 1.5:1 or 2:1 initially, as you aim for the subtle ‘glue’ effect rather than robust reduction.
Using Too Much Gain Reduction
This issue ties heavily into using too high a ratio. Mix bus compression is meant for gentle refinement; excessive gain reduction could wreak havoc on your dynamics, leading your mix to ‘pump’ distractingly or squash it flat.
Remember that we’re not looking to see huge moves on our gain reduction meter during this step in mixing.
Aim for small amounts (1-3dB generally). Gently squeeze the overall dynamics but still preserve transients and punchiness.
Fast Attack Time
A rapid attack time can overwork the compressor immediately, introducing distortion to transients and potentially creating an unnatural sound.
I suggest starting with moderate attack times (say 10-30ms). Remember, it’s always advisable to listen carefully during these adjustments, as every track might need different settings depending on its characteristics.
Fast Release Time
Generally, a fast release time may make your compressor reduce quieter portions too quickly, causing noticeable pumping effects or distortion.
To minimize these undesirable effects, consider slower release times (maybe around 60ms) as an initial setting and adjust as required by listening closely.
Slow Release Time
Ironically enough, slow release times can also put you in hot water like fast ones! If set too slow, the compressor might not reset before the next transient, causing muddiness due to cumulative reduction applied over time.
Finding that sweet spot between avoiding fast peaks and keeping overall compression consistent is essential!
The beauty lies in subtlety, experimentation & understanding that there’s no one-size-fits-all solution! So make sure while making music, don’t forget to let your ears have the final call.
Also Read: Bass Compression 2025 [Essential Guide To Mix Like A Pro]
FAQs About mix bus compression
What is the primary purpose of mix bus compression?
Mix bus compression helps achieve a balanced and robust sound by processing the mix or subgroup of tracks.
How does mix bus compression affect my music?
It subtly “glues” individual sections of your track together, creating sonic coherence and making elements interact harmoniously.
Is mix bus compression necessary for all kinds of music?
While it enhances many genres, it isn’t universally necessary. Its usage largely depends on the type of music and personal production style.
Can I use mix bus compression along with individual track compression?
Yes, mix bus compression doesn’t replace individual track compression but complements it to create a unified sound.
What could happen if I overdo mix bus compression?
Overuse may result in an overcompressed, flat audio lacking dynamics and depth.
Conclusion
Mix bus compression is an essential component in the audio mixing landscape.
While it requires meticulous attention to settings and careful application, its benefits make the effort worthwhile.
It adds a smooth, cohesive layer to your mix and enhances the listening experience.
As with all tools in audio production, remember to use it tastefully and sparingly – subtlety is key.
So roll up your sleeves and start tinkering with mix bus compression – you might discover that elusive ‘glue’ to bind your mix seamlessly together!


