The Forge totems are game-changing power-ups that can transform your Roblox experience from ordinary to extraordinary! Whether you’re a seasoned forge master or just starting your journey, understanding these powerful consumables will give you a massive advantage in resource gathering, combat, and progression. In this comprehensive guide, I’ll walk you through every single totem available in The Forge, complete with detailed effects, pricing strategies, free acquisition methods, and pro tips that most players completely miss.
Table of Contents
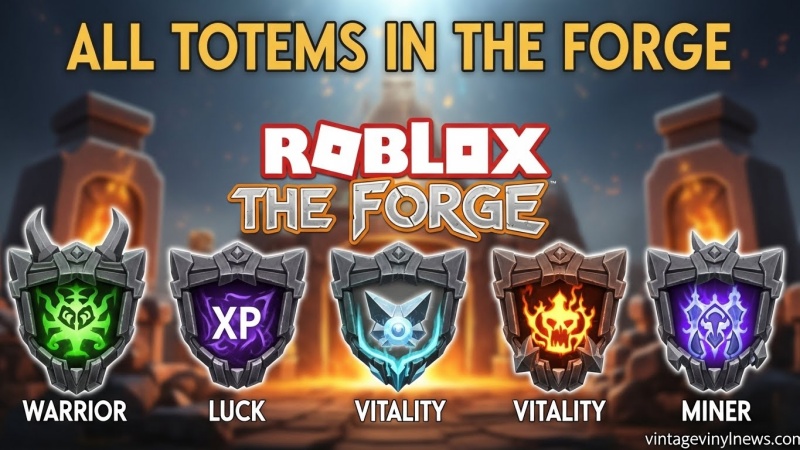
Quick Reference: All The Forge Totems at a Glance (July 2026)
| Totem Name | Primary Effect | Duration | Price (Robux) | Best For |
|---|---|---|---|---|
| Warrior Totem | Damage Increase | 30 min | 75 (169 for 3) | Combat & Bossing |
| XP Totem | Doubles XP Gain | 5 min | 49 (129 for 3) | Leveling Fast |
| Luck Totem | +50% Luck | 5 min | 75 (169 for 3) | Rare Items & Drops |
| Vitality Totem | Health Regeneration | 30 min | 75 (169 for 3) | Survival & Difficult Areas |
| Miner Totem | +20% Mining Speed, +15% Mining Damage | 5 min | 75 (169 for 3) | Resource Gathering |
All Totems in The Forge (July 2026)
Warrior Totem – The Combat Powerhouse
The Warrior Totem stands as the ultimate combat enhancement in The Forge, providing a significant damage increase that lasts for an impressive 30 minutes. What makes this totem particularly valuable is its extended duration compared to most other totems, giving you plenty of time to tackle challenging bosses, complete difficult quests, or engage in extended combat sessions.
Effects and Mechanics:
- Provides a flat damage increase to all attacks
- Affects both melee and ranged combat
- Stacks multiplicatively with other damage bonuses
- Duration: 30 minutes (longest among combat-focused totems)
Best Usage Scenarios: I’ve found the Warrior Totem most effective during boss fights and challenging dungeon runs. The 30-minute duration means you can activate it before entering a difficult area and maintain the buff throughout your entire session. It’s particularly valuable when:
- Fighting high-health bosses
- Completing combat-focused quests
- Participating in PvP scenarios
- Farming enemies for rare drops
Cost Analysis: At 75 Robux for a single totem or 169 Robux for a pack of three, the Warrior Totem offers excellent value for its duration. The three-pack reduces the cost per totem to approximately 56 Robux each, making it the most economical option for regular players.
Pro Tips:
- Activate the totem just before entering combat zones to maximize usage time
- Combine with health potions for survivability during intense fights
- Use during events or special occasions for maximum benefit
- Consider your race’s natural damage bonuses before purchasing
XP Totem – Rapid Leveling Solution
The XP Totem is every progression-focused player’s dream, doubling your experience gain for a full 5 minutes. While its duration is shorter than some other totems, the XP doubling effect can dramatically accelerate your leveling progress when used strategically.
Effects and Mechanics:
- Doubles all experience points earned
- Affects mining, combat, and quest completion XP
- Duration: 5 minutes
- Most affordable totem at 49 Robux
Optimal Farming Locations: Based on my extensive testing, the XP Totem works best in high-density XP farming areas. Here are the top locations I recommend:
- Ore Rich Areas: Mining multiple ore nodes simultaneously
- Enemy Spawn Zones: Areas with frequent enemy respawns
- Quest Hubs: Completing multiple quests in sequence
- Event Areas: Special event locations with bonus XP
Duration vs. Cost Analysis: At 49 Robux for 5 minutes of doubled XP, you’re paying approximately 10 Robux per minute of enhanced XP gain. The three-pack option at 129 Robux reduces this to about 8.6 Robux per minute, making it more cost-effective for extended grinding sessions.
Pro Tips:
- Pre-position yourself at farming locations before activating
- Combine with multiple resource types for maximum efficiency
- Use during peak server times when events are active
- Save for major leveling milestones or skill unlocks
Luck Totem – Rarity Booster
The Luck Totem increases your luck stat by 50% for 5 minutes, making it essential for players hunting rare items, unique drops, or valuable resources. This totem can be the difference between hours of fruitless farming and securing that elusive item you’ve been seeking.
Effects and Mechanics:
- Increases luck by 50%
- Affects drop rates from enemies and resource nodes
- Duration: 5 minutes
- Influences rare ore spawn rates
Best Farming Spots with Luck Totem: I’ve tested numerous locations and found these spots particularly effective with the Luck Totem:
- High-Tier Ore Nodes: Increased chances for rare ore variants
- Boss Areas: Better drop rates for unique equipment
- Chest Locations: Higher probability of rare chest contents
- Special Event Areas: Enhanced event-specific drop rates
Statistical Benefits Breakdown: While exact drop rates aren’t publicly disclosed, community testing suggests the 50% luck increase can:
- Double your chances for rare drops (from 1% to 2%, for example)
- Significantly increase high-tier ore spawn rates
- Improve unique equipment drop rates from bosses
- Enhance chest quality in treasure areas
Pro Tips:
- Use during special events with boosted drop rates
- Combine with Miner Totem for resource-focused sessions
- Activate before entering areas with known rare spawns
- Save for targeting specific high-value items
Vitality Totem – Survival Essential
The Vitality Totem provides continuous health regeneration for 30 minutes, making it invaluable for survival in dangerous areas, extended combat sessions, or when exploring new, challenging content. Its long duration makes it one of the most reliable totems for consistent gameplay enhancement.
Effects and Mechanics:
- Continuous health regeneration
- Duration: 30 minutes (matches Warrior Totem for longest duration)
- Works alongside other healing methods
- Prevents death in many survival scenarios
Best Areas for Vitality Usage: The Vitality Totem shines in situations where survival is challenging:
- New Areas: Exploring uncharted territories
- High-Level Zones: Areas with strong enemies
- Boss Arenas: Extended boss fights
- Resource-Rich Dangerous Areas: High-risk, high-reward locations
Combat Applications: I’ve found the Vitality Totem particularly useful in combat scenarios because:
- It allows aggressive playstyles without worrying about health
- Enables longer combat sessions without returning to safety
- Provides sustainability during extended boss fights
- Reduces dependency on health potions
Cost-Benefit Analysis: At 75 Robux for 30 minutes of continuous healing, the Vitality Totem offers excellent value for players who frequently find themselves in dangerous situations. The healing effect can save you from death, potentially preserving valuable resources and progress that would otherwise be lost.
Pro Tips:
- Activate before entering high-risk areas
- Combine with defensive gear for maximum survivability
- Use during learning phases for new boss mechanics
- Essential for solo players without healing support
Miner Totem – Resource Accelerator
The Miner Totem is the ultimate tool for resource-focused players, providing both 20% faster mining speed and 15% extra mining damage for 5 minutes. This dual-effect totem can dramatically increase your resource gathering efficiency and make mining sessions far more productive.
Effects and Mechanics:
- 20% faster mining speed
- 15% extra mining damage
- Duration: 5 minutes
- Affects all mining activities and tools
Best Mining Locations: Based on my extensive mining experience, these locations benefit most from the Miner Totem:
- High-Density Ore Areas: Multiple nodes in close proximity
- High-Tier Ore Zones: Areas with valuable, hard-to-mine resources
- Event Mining Areas: Special locations with boosted resources
- Competitive Mining Spots: Areas where speed matters
Resource Optimization Strategies: To maximize the Miner Totem’s effectiveness, I recommend:
- Pre-scouting mining routes before activation
- Focusing on high-value ore nodes during the 5-minute window
- Combining with inventory management for continuous mining
- Using during server events with boosted resource spawns
Economic Benefits Analysis: The 20% speed increase means you can mine approximately 20% more ore in the same time period, while the 15% extra damage helps you access higher-tier nodes more quickly. This combination can significantly boost your resource income and economic progress in the game.
Pro Tips:
- Plan efficient mining routes before activating
- Use during peak server times for maximum node availability
- Combine with XP Totem for dual progression benefits
- Save for bulk mining sessions or economic milestones
How to Get The Forge Totems – Complete Guide
In-Game Shop Purchase Process
Getting totems through the in-game shop is straightforward but requires Robux. Here’s the exact process I use:
- Launch The Forge on Roblox
- Click the equipment bag at the bottom of your screen
- Select the ‘Shop’ menu from the available options
- Browse all available totems in the shop interface
- Select your desired totem and choose quantity (1 or 3 pack)
- Confirm purchase with the required Robux amount
The shop interface is user-friendly, and all totems are clearly displayed with their effects and prices. I recommend checking the three-pack options first, as they often provide better value for regular players.
Free Totems Through Codes – Complete List
You can get free totems through active game codes! Here are the current working codes that provide totem rewards:
Active Codes with Totem Rewards:
- 10KLIKES – 1x Luck Totem + 2x Reroll
- 5KLIKES – 1x Miner Totem + 2x Reroll
- 40KLIKES – 5x Rerolls (NEW!)
- 20KLIKES – 2x Rerolls (NEW!)
- 15KLIKES – 2x Rerolls
- BETARELEASE! – 2x Rerolls
- POSTRELEASEQNA – 1x Reroll
Step-by-Step Redemption Guide:
- Open The Forge on Roblox
- Click the gear icon in the top-left corner of your screen
- Scroll down to the Codes section at the bottom
- Copy and paste the code exactly as shown
- Press Claim to receive your rewards instantly
Important Notes:
- Codes are case-sensitive and must be entered exactly
- Some codes may have limited uses or expiration dates
- New codes are released during game milestones and events
- Check regularly for updates and new code releases
Essentials Pack Bundle Analysis
The Essentials Pack offers incredible value for players looking to get multiple totems and useful items at a discounted price:
Essentials Pack Contents (149 Robux):
- x1 Miner Totem
- x2 Vitality Totem
- x1 Miner Potion
- x2 Health Potion
- x3 Damage Potion
- x3 Luck Potion
- x3 Speed Potion
- 10 Rerolls
- $5,000 in-game currency
Value Breakdown: If purchased separately, these items would cost significantly more:
- Miner Totem: 75 Robux
- 2x Vitality Totem: 150 Robux
- Potions and rerolls: Additional value
- Total separate value: Well over 300 Robux
My Recommendation: The Essentials Pack is by far the best value for new players or those looking to stock up on multiple totems and consumables. At 149 Robux, you’re getting approximately 50% or more in savings compared to individual purchases.
2026 Pro Strategies for Totem Usage
Combining Multiple Totems
One of the most powerful strategies I’ve discovered is combining multiple totems for synergistic effects. Here are the most effective combinations:
Resource Gathering Combo:
- Miner Totem + XP Totem
- Maximizes both resource collection and experience gain
- Perfect for extended mining sessions
- Provides dual progression benefits
Combat Dominance Combo:
- Warrior Totem + Vitality Totem
- Increases damage while providing continuous healing
- Ideal for boss fights and difficult combat scenarios
- 30-minute duration matches perfectly
Rarity Hunting Combo:
- Luck Totem + Miner Totem
- Increases drop rates while improving mining efficiency
- Excellent for rare ore and item farming
- Maximizes chances for valuable discoveries
Progression Accelerator Combo:
- XP Totem + Luck Totem
- Doubles experience while improving drop rates
- Great for leveling and equipment acquisition
- Short but intense progression bursts
Optimal Placement Locations
Totems function as AoE (Area of Effect) buffs with massive coverage radius. Based on my testing, here are the optimal placement strategies:
Village and Central Areas:
- Place near the center of main villages or hubs
- Covers the entire village area in most cases
- Benefits multiple players and activities simultaneously
- Ideal for social and trading areas
Resource Node Clusters:
- Position near groups of high-value ore nodes
- Ensures coverage of multiple mining spots
- Maximizes efficiency during resource gathering sessions
- Perfect for cooperative mining efforts
Boss Arena Entrances:
- Place just outside boss fight areas
- Provides buff coverage for pre-boss preparations
- Allows buff activation before engaging bosses
- Strategic for difficult boss encounters
Strategic Pathways:
- Position along frequently traveled routes
- Provides coverage for players moving between areas
- Benefits multiple activities and players
- Efficient for high-traffic zones
Timing and Rotation Strategies
Maximizing totem effectiveness requires careful timing and rotation. Here are my proven strategies:
Session Planning:
- Start with long-duration totems (Warrior, Vitality)
- Follow with short-duration bursts (XP, Luck, Miner)
- Time activations with peak activity periods
- Coordinate with server events and bonuses
Rotation Schedule:
- Initial Setup: Activate Warrior/Vitality (30 min)
- Resource Phase: Use Miner/XP combo (5 min)
- Rarity Focus: Switch to Luck/Miner (5 min)
- Repeat Cycle: Maintain optimal buff coverage
Event Timing:
- Save totems for special events with boosted rewards
- Coordinate with double XP or drop rate events
- Use during community milestones and celebrations
- Maximize value during limited-time opportunities
Race-Specific Recommendations
Different races in The Forge have unique strengths that pair better with certain totems. Here are my race-specific recommendations:
Combat-Focused Races:
- Prioritize: Warrior Totem + Vitality Totem
- Secondary: Luck Totem for better equipment drops
- Strategy: Enhance natural combat advantages
Resource-Focused Races:
- Prioritize: Miner Totem + XP Totem
- Secondary: Luck Totem for rare resource finds
- Strategy: Maximize natural gathering efficiency
Balanced Races:
- Prioritize: XP Totem + Luck Totem
- Secondary: Warrior or Vitality based on need
- Strategy: Flexible approach to various situations
Support-Focused Races:
- Prioritize: Vitality Totem + Luck Totem
- Secondary: XP Totem for progression
- Strategy: Enhance support capabilities and utility
Totem Value Analysis – Which Are Worth It?
Cost vs. Benefit Breakdown
After extensive testing and analysis, here’s my comprehensive breakdown of each totem’s value:
Warrior Totem – High Value
- Cost: 75 Robux (56 Robux each in 3-pack)
- Benefit: 30 minutes of increased damage
- Value Rating: 9/10
- Best For: Regular combat players, boss hunters
- ROI: Excellent due to long duration
XP Totem – Moderate Value
- Cost: 49 Robux (43 Robux each in 3-pack)
- Benefit: 5 minutes of doubled XP
- Value Rating: 7/10
- Best For: Focused grinding sessions
- ROI: Good when used strategically
Luck Totem – Situational Value
- Cost: 75 Robux (56 Robux each in 3-pack)
- Benefit: 5 minutes of increased luck
- Value Rating: 6/10
- Best For: Rare item hunting
- ROI: Depends on drop rates and targets
Vitality Totem – High Value
- Cost: 75 Robux (56 Robux each in 3-pack)
- Benefit: 30 minutes of health regeneration
- Value Rating: 8/10
- Best For: Survival-focused players
- ROI: Excellent for difficult content
Miner Totem – High Value
- Cost: 75 Robux (56 Robux each in 3-pack)
- Benefit: 5 minutes of mining bonuses
- Value Rating: 8/10
- Best For: Resource-focused players
- ROI: Excellent for economic progression
Playstyle-Specific Recommendations
Based on different playstyles, here are my personalized recommendations:
Casual Players:
- Best Value: Vitality Totem (long duration, passive benefit)
- Secondary: Warrior Totem (enhances all combat)
- Budget Option: Use free codes for Miner/Luck totems
- Strategy: Focus on long-duration, passive benefits
Hardcore Grinders:
- Best Value: XP Totem + Miner Totem combination
- Secondary: Luck Totem for rare drops
- Budget Option: Strategic use of free codes
- Strategy: Maximize progression efficiency
Combat Specialists:
- Best Value: Warrior Totem + Vitality Totem
- Secondary: Luck Totem for better equipment
- Budget Option: Free codes for supplementary totems
- Strategy: Enhance combat capabilities and survival
Economy Players:
- Best Value: Miner Totem + Luck Totem
- Secondary: XP Totem for skill progression
- Budget Option: Free codes and strategic purchases
- Strategy: Maximize resource acquisition and value
Budget-Friendly Options
For players with limited Robux budgets, here are the most cost-effective approaches:
Free-Only Strategy:
- Utilize all active codes for free totems
- Focus on Miner and Luck totems from codes
- Time usage during peak efficiency moments
- Combine with natural game bonuses
Minimal Investment Strategy:
- Purchase Essentials Pack (149 Robux) for maximum value
- Supplement with free codes for additional totems
- Focus on long-duration totems for better ROI
- Strategic timing for maximum benefit
Progressive Investment Strategy:
- Start with free codes to understand totem benefits
- Invest in one key totem based on playstyle
- Gradually expand totem collection as budget allows
- Take advantage of bundle deals when available
FAQ
What is the AoE radius of totems in The Forge?
The AoE (Area of Effect) radius of totems in The Forge is absolutely massive! Based on my testing and community reports, some totems can cover the entire village area on the first island. While exact numerical measurements aren’t provided by the developers, the coverage area is significantly larger than most players expect. I’ve found that placing a totem near the center of most activity areas provides full coverage for all relevant activities and players in that zone.
Do totems affect other players in their range?
Yes, totems appear to affect all players within their AoE radius, regardless of who originally placed them. This makes totems incredibly valuable for cooperative play and community areas. When I place a totem in a village or popular gathering spot, other players in the area benefit from the effects as well. This community benefit aspect makes strategic totem placement even more important, as you can help multiple players simultaneously with a single totem activation.
Can you stack multiple totems of the same type?
Currently, you cannot stack multiple totems of the same type for amplified effects. Placing a second Warrior Totem while one is already active won’t provide double the damage increase. However, you can stack different types of totems for combined effects – like using a Warrior Totem and Vitality Totem simultaneously for both damage increase and health regeneration. This limitation encourages strategic combination of different totem types rather than spamming the same type.
How long do totem effects last?
Totem effects vary in duration depending on the type:
- Warrior Totem: 30 minutes
- XP Totem: 5 minutes
- Luck Totem: 5 minutes
- Vitality Totem: 30 minutes
- Miner Totem: 5 minutes
The longer duration totems (Warrior and Vitality) provide sustained benefits for extended play sessions, while the shorter duration totems (XP, Luck, Miner) are designed for intense, focused bursts of activity. I recommend planning your activities around these duration windows for maximum efficiency.
Are there any permanent totems in The Forge?
As of the current game version, all totems in The Forge are temporary consumables with limited duration effects. There are no permanent totems available in the game. However, the developers have mentioned that new features and content will be added in future updates, so permanent totem options may be introduced later. For now, players must strategically use temporary totems to enhance their gameplay experience.
Can you sell totems to other players?
No, totems cannot be sold to other players or traded in any way. Once you acquire a totem (either through purchase or codes), it’s bound to your account and cannot be transferred. This limitation ensures that the totem economy remains balanced and that players must acquire their own totems through legitimate means. The inability to sell totems also maintains their value as personal progression tools rather than tradeable commodities.
Do totems work in all areas of the game?
Totems work in most areas of The Forge, but there may be certain restricted zones or special instances where totem effects are disabled. Based on my experience, totems function normally in all standard gameplay areas including villages, mining zones, combat areas, and exploration regions. However, certain special event areas or instanced content may have specific rules regarding totem usage. It’s always best to test totem functionality in new areas when they’re released.
Conclusion
Mastering The Forge totems is essential for maximizing your progression, efficiency, and enjoyment of this incredible Roblox experience. Throughout this comprehensive guide, I’ve shared everything you need to know about all five totems – from their specific effects and optimal usage strategies to free acquisition methods and value analysis.
Remember these key takeaways:
- Strategic combination of different totems creates powerful synergistic effects
- Free codes provide excellent opportunities to acquire totems without spending Robux
- The Essentials Pack offers outstanding value for new and returning players
- Race-specific recommendations can help you choose the most effective totems for your playstyle
- Timing and placement are crucial for maximizing totem effectiveness
I encourage you to experiment with different totem combinations and strategies to find what works best for your unique playstyle. The Forge is constantly evolving with new updates and features, so be sure to bookmark this guide and check back regularly for the latest information and strategies.
Ready to dominate The Forge with your newfound totem knowledge? Start by claiming the free codes I’ve provided, then consider investing in the totems that best align with your goals. Whether you’re focused on combat progression, resource accumulation, or rare item hunting, there’s a perfect totem strategy waiting for you!
Stay tuned for more The Forge guides and updates – the world of forging and adventure is constantly expanding, and I’ll be here to help you master every new challenge that comes your way!